The Ultimate Guide to Ultrasonic PCB Cleaners 2025
2026-04-14
This comprehensive guide will explore everything you need to know about the pcb ultrasonic cleaner process—from the science behind cavitation to advanced techniques for cleaning pcb boards and selecting the ideal pcb board cleaning machine for your operation.
In the fast-paced world of electronics manufacturing and repair, contaminant-free printed circuit boards are essential for reliable performance. An ultrasonic pcb cleaner leverages high-frequency sound waves and a specialized cleaning solution to remove solder flux, oils, dust, and microscopic particulates from even the most complex PCB assemblies. This comprehensive guide will explore everything you need to know about the pcb ultrasonic cleaner process—from the science behind cavitation to advanced techniques for cleaning pcb boards and selecting the ideal pcb board cleaning machine for your operation.
Whether you’re a hobbyist learning how to use ultrasonic cleaner for pcb or a production manager evaluating industrial pcb ultrasonic cleaning machines, understanding the nuances of cleaning pcb with ultrasonic cleaner will enhance product quality, reduce rework, and extend PCB life.
Why Use an Ultrasonic PCB Cleaner?
Superior Contaminant Removal
Traditional manual cleaning or spray-wash systems often struggle to reach under surface-mount devices (SMDs), inside microvias, and along integrated circuit pins. An ultrasonic cleaner for pcb penetrates every nook and cranny, ensuring:
-
Complete flux removal: Eliminates rosin and ionic residues that lead to corrosion.
-
Particle extraction: Dislodges solder balls and dust that can cause shorts.
-
Oil and grease elimination: Cleans handling residues from assembly and testing.
Consistency and Reproducibility
When you invest in a pcb cleaning machine with programmable cycles, you gain:
-
Batch uniformity: Each PCB experiences identical cavitation intensity and solution exposure.
-
Process validation: Digital controls and data logging support ISO, IPC, and UL certifications.
Reduced Labor and Faster Throughput
Automating cleaning a pcb board with an ultrasonic system streamlines workflows:
-
Hands-off operation: Technicians load PCBs and initiate the cycle, freeing time for higher-value tasks.
-
Batch capability: Clean dozens of boards simultaneously, increasing throughput by up to 300%.
Protection of Delicate Components
Gentle cavitation cleans without mechanical abrasion:
How Ultrasonic Cleaning Works on PCBs
Cavitation Mechanics
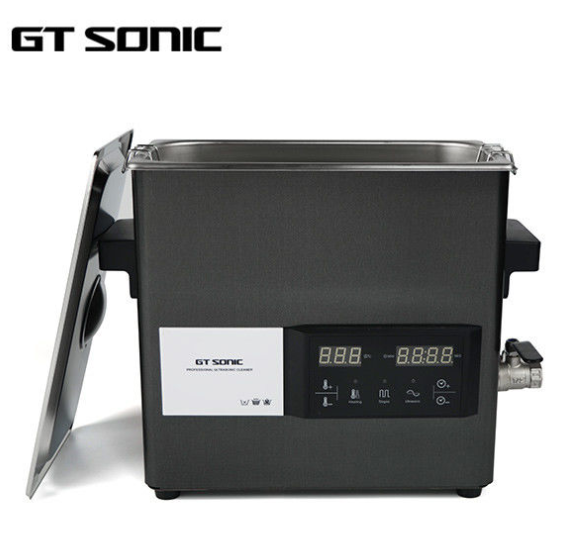
An ultrasonic pcb cleaner consists of:
-
Transducers: Devices bonded to the tank bottom or sides that convert electrical energy into ultrasonic vibrations (typically 25–40 kHz).
-
Generator: Supplies pulsed or continuous power to the transducers.
-
Stainless-steel Tank: Holds the pcb board cleaning solution.
When powered, the transducers emit high-frequency sound waves that create alternating high- and low-pressure zones. During low-pressure cycles, microscopic vapor cavities (bubbles) form in the solution. On the high-pressure return, these bubbles collapse violently, producing micro-jets and shockwaves that dislodge contaminants from PCB surfaces.
Role of Cleaning Solutions
While cavitation alone provides mechanical agitation, the addition of a pcb board cleaning solution enhances:
-
Surface wetting: Surfactants reduce tension, allowing bubbles to reach recessed areas.
-
Soil encapsulation: Detergents bind to flux residues, emulsifying them for easy removal.
-
Corrosion inhibition: Specialized chemistries protect exposed copper and solder alloys.
Beyond these core functions, cleaning solutions play a critical role in ensuring process stability and repeatability, especially in controlled environments such as laboratories and R&D facilities. In a lab ultrasonic cleaner, solution chemistry must be carefully selected to balance cleaning efficiency with material compatibility, as laboratory PCBs often feature fine-pitch components, exposed test pads, and sensitive surface finishes.
Properly formulated PCB cleaning solutions also improve particle suspension, preventing removed contaminants from redepositing onto the board surface during ultrasonic cycles. This is particularly important in a lab ultrasonic cleaner, where batch sizes are small but cleanliness requirements are high, such as failure analysis, prototype validation, and post-rework inspection.
Key Features of a PCB Ultrasonic Cleaning Machine
When evaluating a pcb ultrasonic cleaning machine, consider the following:
| Feature |
Benefit |
| Frequency Range |
25 kHz for robust soil removal; 40 kHz for delicate assemblies |
| Power Density (W/L) |
50–100 W per liter ensures sufficient cavitation without excessive turbulence |
| Heated Tank (30–50 °C) |
Speeds cleaning and improves detergent performance |
| Filtration & Recirculation |
Removes dislodged particles, extending solution life and preventing redeposition |
| Programmable Controls |
Stores multiple ultrasonic cleaning pcb assemblies recipes for repeatable results |
| Load Capacity & Racks |
Vertical PCB racks maximize exposure; ensure boards don’t touch tank surfaces |
| Low-Noise Operation |
Minimizes vibration transfer to sensitive bench equipment |
| Solution Level Sensor |
Prevents dry-run damage to transducers by alerting when the solution is below the minimum mark |
Choosing the Right Ultrasonic Cleaner for PCB Cleaning
To select an ideal pcb board cleaner, ask:
-
What volume of PCBs will I clean?
-
How delicate are the components?
-
Do I need filtration?
-
Is process validation required?
-
What cleaning solutions will I use?
Preparing for Cleaning PCB Boards
Workspace Setup
-
Electrical Safety: Ground the unit and use GFCI outlets.
-
ESD Control: Implement antistatic mats and wrist straps.
-
Ventilation: Install local exhaust for fumes from cleaning solutions.
Selecting Cleaning Solutions
-
pH-Neutral Detergents: Safe for most solder masks and components.
-
Alkaline Flux Removers: Excellent for rosin-based flux, beware of aggressive chemistries.
-
No-Rinse Formulas: Ideal for reducing rinse water usage.
Degassing the Solution
Before cleaning pcb with ultrasonic cleaner, run a short degas cycle (2–3 minutes) to remove air pockets that interfere with cavitation. This step ensures maximum cleaning efficiency.
How to Clean PCB in Ultrasonic Cleaner
Follow these detailed steps to achieve optimal pcb cleaning results:
Fill and Heat the Tank
-
Pour deionized water into the ultrasonic cleaner for pcb to the “min” mark.
-
Add recommended amount of pcb board cleaning solution (usually 1–3% v/v).
-
Set heater to 35–45 °C; wait until temperature stabilizes.
Degas Cycle
-
Select “Degas” or “Defoaming” mode on the control panel.
-
Run for 2–3 minutes to eliminate dissolved gases.
-
Listen for a uniform “hiss” indicating stable cavitation.
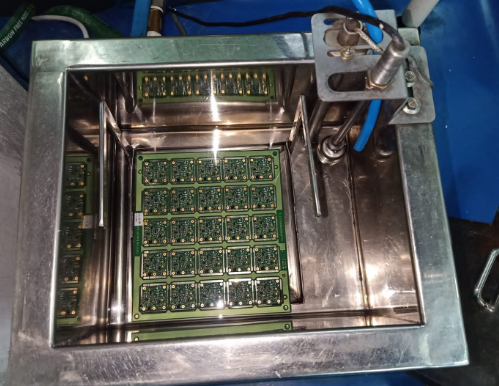
Load PCBs
-
Mount boards vertically in PCB racks, ensuring no contact with tank walls.
-
Space boards at least 10 mm apart for fluid circulation.
Program Cleaning Parameters
| Parameter |
Recommended Setting |
| Frequency |
25 kHz for heavy flux; 40 kHz for delicate PCBs |
| Power |
70–100% of generator capacity |
| Temperature |
35–45 °C |
| Time |
3–8 minutes, adjusted by soil level |
Start the Cycle
-
Press “Start” and monitor for steady ultrasonic noise.
-
If foam appears, pause and add approved defoamer.
-
Avoid opening the lid mid-cycle to prevent cavitation loss.
Rinse and Dry
-
Lift the rack slowly to drain residual solution back into the tank.
-
Rinse boards in deionized water (manual or ultrasonic rinse cycle).
-
Dry using filtered compressed air or a temperature-controlled drying oven (50–60 °C).
Recommended PCB Board Cleaning Solutions
Selecting the right pcb board cleaning solution is as important as choosing the correct machinery. Consider:
| Solution Type |
Advantages |
Notes |
| pH-Neutral Detergent |
Gentle on solder masks and plastics |
Safe for mixed-component boards |
| Alkaline Flux Remover |
Effective on rosin/organic flux |
Rinse thoroughly to avoid ionic residue |
| No-Rinse Electronics Cleaner |
Eliminates rinse step, speeds workflow |
Best for light to moderate soils |
| Aqueous Defluxer |
Water-based, environmentally friendly |
May require filtration system for longer solution lifespan |
| Hydrocarbon Solvent |
Fast evaporation, no residue |
Use in well-ventilated fume hood; check material compatibility |
Maintenance of Your PCB Board Cleaning Machine
To ensure longevity and consistent performance of your pcb ultrasonic cleaner, implement a routine maintenance schedule:
Daily Tasks
|
Weekly Tasks
|
Monthly Tasks
|
Annual Service
|
-
Change or Filter Solution: Replace if visibly contaminated or after 10–20 cycles.
-
Wipe Tank Interior: Remove residue and inspect for corrosion.
-
Check Racks and Fixtures: Ensure secure mounting and no warping.
|
-
Clean Filters: Backflush or replace inline filters in recirculation systems.
-
Inspect Transducers: Listen for abnormal noise indicating potential failure.
-
Verify Temperature Accuracy: Compare tank heater reading with an external thermometer.
|
-
Foil Test: Place aluminum foil in tank during a short cycle—uniform pitting indicates consistent cavitation.
-
Calibrate Controls: Ensure timer, temperature, and power settings match specifications.
|
-
Professional Inspection: Have a service technician test generator output, replace worn gaskets, and re-bond transducers if needed.
-
Electrical Safety Check: Verify grounding and insulation integrity.
|
Safety Considerations When Cleaning PCBs
While cleaning pcb boards is generally safe, observe these precautions:
-
ESD Protection: Always ground yourself and PCBs to prevent electrostatic discharge damage.
-
Chemical Safety: Use gloves, goggles, and operate in a fume-ventilated area when handling alkaline or solvent-based pcb cleaner solutions.
-
Electrical Safety: Never operate the unit with low or no solution—transducers can overheat and fail.
-
Thermal Caution: Heated tanks can cause burns; allow cool-down before draining or cleaning.
Advanced Tips for Ultrasonic Cleaning PCB Assemblies
Dual-Frequency Cleaning
Some pcb ultrasonic cleaning machines offer dual-frequency modes (e.g., 25/45 kHz):
Switch mid-cycle for optimized cleaning pcb assemblies.
Pulse and Sweep Modes
-
Pulse Mode: Alternates power on/off for intervals, improving bubble collapse energy.
-
Sweep Mode: Modulates frequency slightly around the setpoint to avoid standing-wave dead zones.
Temperature Profiling
Inline Rinse and Dry Integration
Integrate your pcb board cleaning machine into an automated line:
-
Ultrasonic wash → 2. Ultrasonic rinse → 3. Hot air knife dry
-
Conveyorized racks for hands-free throughput
Troubleshooting Common Issues with PCB Cleaners
| Problem |
Cause |
Solution |
| Uneven cleaning / dead zones |
Standing waves, blocked transducers |
Use sweep mode; reposition racks; clean transducer bonding |
| Excessive foaming |
High-foaming detergent |
Lower concentration; switch to low-foam pcb board cleaning solution |
| Noisy operation |
Loose transducer, air entrapment |
Tighten mounting; run extended degas cycle |
| Corrosion on tank edges |
Aggressive alkaline solution |
Reduce pH; rinse tank thoroughly; apply corrosion inhibitors |
| Residue redeposition |
No filtration or old solution |
Install inline pcb cleaning machine filter; replace solution |
Environmental and Cost Benefits
Reduced Chemical Waste
Energy Efficiency
ROI and Total Cost of Ownership
-
Lower labor costs through automation.
-
Reduced rework from consistent, high-quality pcb cleaning.
-
Extended PCB lifespan, avoiding premature failure due to residual contamination.
Case Studies
| Clinets |
Challenge |
Solution |
Result |
|
Contract Manufacturer
|
Inconsistent flux removal led to 8% first-pass failure rate. |
Implemented a 25 kHz ultrasonic pcb cleaner with filtration and programmable cycles. |
First-pass yield increased to 92%, saving $50k annually in rework costs. |
|
Electronics Lab Prototyper
|
Manual PCB cleaning took 10 minutes per board. |
Deployed a 3 L benchtop pcb ultrasonic cleaning machine and pcb board cleaning solution. |
Cycle time reduced to 5 minutes, doubling prototyping throughput. |
|
Medical Device Maker
|
Regulatory audits flagged inconsistent cleaning validation records. |
Switched to an industrial pcb ultrasonic cleaner with data-logging and foil-test validation. |
Passed ISO 13485 audit with zero non-conformities; improved traceability. |
Conclusion
An ultrasonic pcb cleaner is an indispensable tool for electronics professionals seeking deep, consistent, and efficient pcb cleaning. Whether you’re exploring how to use ultrasonic cleaner for pcb at a hobbyist level or evaluating an industrial pcb ultrasonic cleaning machine for high-volume production, this guide equips you with the knowledge to optimize every aspect of cleaning pcb boards. Embrace ultrasonic technology and elevate your PCB quality, reliability, and manufacturing efficiency today.


