How to Use a Lab Ultrasonic Cleaner
2025-08-21
This in-depth guide covers everything you need to know—from fundamental principles and equipment selection to step-by-step operation, maintenance, safety considerations, troubleshooting tips, and advanced applications—to help you get the most out of your laboratory ultrasonic cleaner.
A lab ultrasonic cleaner is an essential tool for modern laboratories, delivering unmatched cleaning performance by harnessing high-frequency sound waves to remove contaminants, residues, and particulates from complex instruments and glassware. This in-depth guide covers everything you need to know—from fundamental principles and equipment selection to step-by-step operation, maintenance, safety considerations, troubleshooting tips, and advanced applications—to help you get the most out of your laboratory ultrasonic cleaner.
Table of Contents
-
Introduction of Ultrasonic Cleaning
-
How Does Ultrasonic Cleaning Machine Works
-
Benefits of Using an Ultrasonic Bath for Laboratory
-
Comnon Types of Lab Equipment Ultrasonic Cleaners
-
Key Selection Criteria for a Lab Safety Supply Ultrasonic Cleaner
-
Lab safety Supply Ultrasonic Cleaner Manual(Step-by-Step)
-
Maintenance and Troubleshooting
-
Safety Considerations for Ultrasonic Cleaner Uses in Laboratory
-
Advanced Applications and Optimization
-
FAQs
Introduction of Ultrasonic Cleaning
Laboratories across industries—from pharmaceuticals and biotechnology to materials science and electronics—demand exceptionally clean equipment to ensure experimental accuracy, contamination control, and regulatory compliance. Manual scrubbing, while sometimes effective, cannot reliably reach micro-creases, lumens, and intricate geometries found in modern labware. Enter the lab ultrasonic cleaner, a device that uses ultrasonic energy to create microscopic bubbles that implode against surfaces, dislodging soils without harsh abrasion.
In this guide, we delve into the science behind ultrasonic cleaning, explore the various laboratory ultrasonic cleaner types available, and provide a detailed walkthrough for selecting, operating, and maintaining your system. Whether you’re a lab manager seeking to implement a new cleaning protocol or a technician aiming to optimize daily workflows, you’ll find actionable insights and best practices for your lab equipment ultrasonic cleaner.
How Does Ultrasonic Cleaning Machine Work?
Cavitation and Bubble Dynamics
At the heart of any ultrasonic bath for laboratory use is the phenomenon of cavitation. When high-frequency sound waves (typically between 20 kHz and 80 kHz) propagate through a liquid, they create alternating high-pressure and low-pressure cycles. During the low-pressure phase, microscopic vapor-filled cavities or bubbles form. In the subsequent high-pressure cycle, these bubbles violently collapse, generating localized high temperatures (up to several thousand Kelvin) and pressures (hundreds of atmospheres) within microseconds. This micro-jetting and shockwave action produce an intense scrubbing effect on immersed surfaces, effectively removing organic residues, particulate matter, oxides, and even microbial films.
Transducers, Generators, and Frequency
-
Transducers convert electrical energy into mechanical vibration. They are affixed to the tank’s exterior or bonded directly to the bottom.
-
Generators drive transducers by producing electrical signals at specific frequencies and power levels. Advanced generators offer adjustable power output and pulse modes, allowing users to tailor cavitation energy to delicate or heavily soiled items.
-
Frequency selection influences cleaning aggressiveness and tank uniformity:
-
Lower frequencies (20–25 kHz) generate larger bubbles and more aggressive cleaning, suitable for robust metal instruments or heavy soils.
-
Higher frequencies (40–80 kHz) yield finer bubbles and gentler cleaning, ideal for delicate glassware, electronics, or precision optics.
How to Choose Lab Cleaning Solutions Effectively
Pure water does produce cavitation, but effective cleaning typically requires a laboratory grade ultrasonic cleaner detergent or surfactant. These additives:
-
Lower surface tension, facilitating bubble formation.
-
Encapsulate dislodged soils for easy rinsing.
-
May include corrosion inhibitors to protect sensitive alloys.
Solutions come in various chemistries—alkaline for organic residues, acid for mineral deposits, neutral for delicate metals, and enzymatic formulations for biological contaminants. Always choose a lab safety supply ultrasonic cleaner solution compatible with both your materials and ultrasonic energy.
Benefits of Using an Ultrasonic Bath for Laboratory
-
Superior Cleaning Efficacy
Ultrasonic energy reaches blind holes, lumens, and micro-textured surfaces that manual methods cannot.
-
Labor and Time Savings
Batch processing allows dozens of parts to be cleaned simultaneously, freeing personnel for higher-value tasks.
-
Consistent and Reproducible Results
Digital controls ensure identical cycle parameters—critical for regulated environments (GLP/GMP).
-
Gentle on Delicate Items
Adjustable frequencies and power levels prevent damage to thin tubing, lenses, or electronic assemblies.
-
Reduced Chemical Usage
Cavitation amplifies detergent action, often lowering required concentrations and waste disposal costs.
-
Enhanced Safety
Enclosed tanks and timed cycles reduce technician exposure to harsh chemicals and manual scrubbing risks.
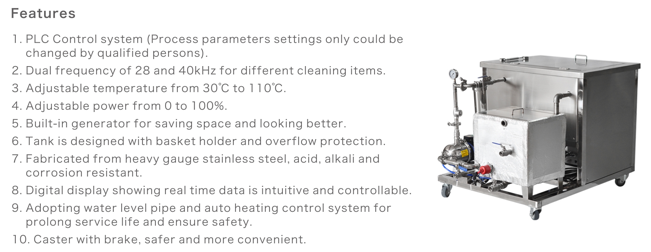
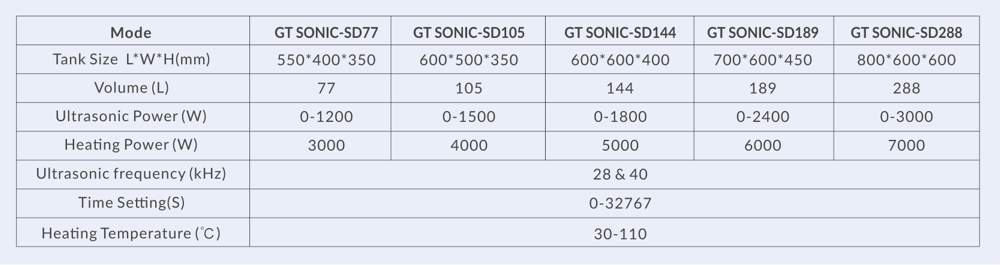
Common Types of Lab Equipment Ultrasonic Cleaners
| Product Name |
Description |
Features |
Applications |
|
Benchtop Ultrasonic Baths
|
Compact units (1–5 L capacity) designed for standard lab bench installations. |
Simple timer and heater controls; often include pulse mode. |
Routine glassware cleaning, small instrument batches, general-purpose labware. |
|
Industrial-Grade Ultrasonic Cleaners
|
Larger tanks (10–50 L or more) for core laboratory, pilot-plant, or manufacturing-adjacent facilities. |
Programmable cycles, heated recirculation, built-in filtration, drain valves. |
High-volume cleaning of reactors, sample holders, large glass vessels. |
|
Integrated Ultrasonic Washers
|
Conveyor or rack-based systems combining ultrasonic pre-cleaning with automated rinsing, drying, and unloading. |
PLC control, validation protocols, multi-stage cleaning. |
Clinical instrument reprocessing, pharmaceutical filling lines, high-throughput labs. |
|
Ultrasonic Cleaning Probes
|
Handheld or fixture-mounted ultrasonic horns inserted directly into vessels or tight spaces. |
Localized cavitation, flexible positioning, minimal footprint. |
On-site cleaning of fixed equipment, inline pipe cleaning, reactive or closed systems. |
Key Selection Criteria for a Lab Safety Supply Ultrasonic Cleaner
Tank Capacity and Material
Frequency and Power Settings
-
Look for dual-frequency models (e.g., 25/45 kHz) or adjustable generators offering 20–80 kHz range.
-
Power density (W/L) determines cavitation intensity; typical values range from 50 to 300 W/L.
Temperature Control
Filtration and Drainage Features
-
Built-in filters capture particulates, extending solution life.
-
Drain valves and quick-connect hoses simplify solution changes and maintenance.
Control Interfaces and Programmability
Safety Features and Compliance
-
Over-temperature and dry-run protection prevent damage.
-
CE, FCC, UL listings and IQ/OQ/PQ documentation support regulatory needs.
Lab Safety Supply Ultrasonic Cleaner Manual(Step by Step)
Step 1 Preparing Your Work Area and PPE
-
Personal Protective Equipment: Lab coat, nitrile gloves, safety goggles.
-
Ventilation: Ensure the area is well-ventilated when using volatile detergents.
-
Surface Protection: Place the unit on a stable, chemical-resistant countertop with drip trays.
Step 2 Cleaning Solution Preparation and Degassing
-
Solution Mixing: Measure detergent per manufacturer’s instructions (e.g., 1–3% v/v) into warm water.
-
Fill Tank: Pour solution up to the “min/max” marks—avoid overfilling.
-
Degassing Cycle: Run a 2–3 minute cycle with no load to expel dissolved gases, stabilizing cavitation.
Step 3 Loading and Positioning Items
-
Use Baskets/Fixtures: Prevent direct part-to-tank contact, which can cause “hot spots.”
-
Spacing: Ensure items do not touch; allow ultrasonic waves to access all surfaces.
-
Orientation: Position lumened devices vertically to facilitate fluid exchange during cavitation.
Step 4 Setting Cleaning Parameters
| Parameter |
Guideline |
| Frequency |
20–25 kHz for robust soils; 40 kHz+ for delicate parts |
| Power Level |
70–100% for heavy soiling; 30–60% for light cleaning |
| Temperature |
25–40 °C general; up to 60 °C for stubborn residues |
| Time |
3–10 minutes per cycle |
-
Program Cycle: Enter frequency, power, temperature, and time.
-
Start: Initiate cleaning; monitor for steady cavitation noise (“hissing”).
Step 5 Running the Cleaning Cycle
-
Observation: Watch for foam formation—add defoamer if necessary or reduce power.
-
Pause if Needed: Interrupt the cycle to reposition items or remove floating debris.
Step 6 Post-Cleaning Rinse and Drying
-
Drain: Lift baskets to let excess solution drain back into the tank.
-
Rinse: Submerge parts in deionized/distilled water or run a rinse program in the ultrasonic unit.
-
Dry: Air dry on a clean rack or use filtered compressed air to avoid water spots.
Maintenance and Troubleshooting
Daily and Weekly Maintenance Tasks
-
Daily: Change solution if visibly dirty; wipe tank interior; inspect baskets/fixtures.
-
Weekly: Clean exterior surfaces and control panel; check for loose fittings, leaks.
-
Monthly: Run a cleaning-validation test (e.g., aluminum foil test) to verify cavitation uniformity.
Periodic Calibration and Service
-
Transducer Inspection: Every 6–12 months by a qualified technician.
-
Generator Calibration: Verify power output and frequency accuracy per manufacturer recommendations.
-
Software Updates: Apply firmware patches for digital units to maintain feature sets and security.
Common Issues and Solutions
| Issue |
Probable Cause |
Remedy |
| Weak or No Cavitation Noise |
Air bubbles, faulty transducer |
Degas solution; inspect/replace transducer |
| Excessive Foaming |
High-foaming detergent |
Reduce detergent concentration; add approved defoamer |
| Tank Leaks |
Seal degradation |
Replace tank gaskets or reseal welds |
| Overheating |
Faulty thermostat or heater element |
Calibrate/replace sensor; service heating element |
| Erratic Digital Controls |
Software glitch |
Reboot unit; update firmware |
Safety Considerations for Ultrasonic Cleaner Uses in Laboratory
Chemical Hazards and Ventilation
Electrical and Mechanical Safety
Ergonomics and Workflow
Advanced Applications and Optimization
Ultrasonic Cleaning in Research and Development
Combining Ultrasonics with Other Modalities
Data Logging and Process Validation
-
Electronic Records: Use units with USB/Ethernet ports to export cycle logs.
-
Validation Protocols: Perform foil tests, aluminum oxide tests, or titanium test kits to document energy distribution.
FAQs
Q1: How often should I replace the cleaning solution?
A: Change whenever the solution is visibly contaminated or after 8–10 cleaning cycles, whichever comes first.
Q2: Can I clean biological samples directly?
A: Only if using an appropriate enzymatic or neutral detergent; rinse thoroughly to remove residual enzymes that may interfere with downstream assays.
Q3: Is ultrasonic cleaning safe for cell culture glassware?
A: Yes—use low power and neutral pH detergents. Avoid plasticware that may absorb cavitation energy unevenly.
Q4: How do I validate my ultrasonic cleaner’s performance?
A: Conduct an aluminum foil test: run the unit for a set time, then inspect foil for uniform pitting as an indicator of consistent cavitation.
Conclusion and Best Practices
Mastering your lab ultrasonic cleaner involves understanding cavitation science, selecting the right equipment, following disciplined operating procedures, and performing regular maintenance. By:
-
Choosing a unit with the proper frequency, power, and capacity
-
Employing compatible, low-foaming detergents
-
Programming reproducible cycles with documented parameters
-
Maintaining rigorous safety and preventive-maintenance protocols
Please ensure that your laboratory grade ultrasonic cleaner delivers reliable, efficient, and safe cleaning for all your critical labware and instruments.
Elevate your lab’s cleaning standards today—optimize your ultrasonic processes, validate performance regularly, and enjoy the precision and consistency that only ultrasonic technology can provide.